Dorico Tip #1: Mutes/Instrument Change Labels (Automated!)
Welcome to my first blog post ever!
I want to share a tip for music arrangers/orchestrators that write for instruments with mutes (let’s say trumpet or trombone) AND use Dorico. If you have never used Dorico before, hopefully, you can learn some techniques that made me finally decide to switch from Finale (after 13 years of using it!). If you don’t want to miss any mute changes, and you’d like to avoid getting asked questions and wasting precious rehearsal time, then you’re in the right place!

You can sign up to get my FREE Big Band and Orchestra Templates here (I’m currently working on adding the updates described below).
The main idea behind this post is that we will think of mute changes in a brass instrument just like any other standard instrument changes (e.g.: Saxophone to Flute). You can apply this framework to any other playing technique that calls for an action from the player, that involves incorporating an external object in the performance of their instrument (like string mutes, switching percussion mallets, etc.).
By the end of this post, you will be able to set your Instrument Change Labels and Staff names like in the picture below:

Note the difference in the Staff labels for each instrument:
The 1st staff displays the full name of the player in the first system, including the main and secondary instrument they play (“Reed 3: Tenor Sax (+. In the subsequent systems, the staff label only displays the instrument currently being performed or held in the first measure.
The 2nd staff always displays the name of the player in its full version for the first system (“Trumpet in Bb3” ) and in its abbreviated version for subsequent systems ( “Tpt in Bb3”), no matter which mute is being used with the main instrument.
Although this would seem to be a long setup process, you will only need to do this once and save the settings as your Default Settings. This will allow you to never worry about missing a mute or instrument change label again.
Before diving into this tutorial, please note there’s a manual, more straightforward alternative to the automated process that I’ll explain below. However, it doesn’t have the added benefit of ensuring you don’t forget to specify mute changes (and believe me, even after double- and triple-checking, I have missed some “to harmon mute” labels and lost precious rehearsal time as a consequence).
If you want to learn about the automated process, you can skip to Instrument Changes below.
Manual Mute Changes
With the “Playing Techniques” tab opened on the right, navigate to the instrument type (“Brass” in my case) and click on the “+” icon.

Then, within the Edit Playing Techniques window, select the specific mute you’d like to add (in my case, the “Harmon mute (text)”).

Finally, select the duplicated Playing Technique, and change the name after “Name:” and “Text:”. Then click “Ok”.

Now you will be able to add the “to harmon mute” label manually. You can repeat this process with any other Playing Technique.
Automated Instrument Changes
(Disclaimer: The steps described below work with Dorico 5.1.40. Dorico is constantly releasing updates, so some of the options mentioned below may not appear in the version you have, either because they are new, or because they have been discontinued).
Dorico has a unique way to automate instrument changes (In my case, I have a Tenor Sax player that doubles on Flute). That means that you don’t have to think about putting the label “to Flute” and then repeat the label of “Flute” before it starts playing. Dorico will do this for you.
You can do this by going to Setup Mode, selecting the Player on the left, and clicking the “+” icon. This will open a window where you’ll select a new instrument.

Once the new instrument is added to the player, we can switch to Write Mode and start writing our music. To assign the music to the new instrument, we need to select “Galley view” (Bottom Right of the screen). This will show us all the available instruments (not only the players). Here we can find the flute and we can start writing the music for it. If we already wrote the music for the flute in the tenor sax staff, we can Cut and Paste it here (or option+M/alt+M to move it down one staff).

When we switch to “Page view” we’ll see that Dorico automatically inserted the Instrument Change Labels for us. Isn’t that neat?

Moreover, Dorico gives us various options for naming the Player’s staves.
If we look at our first page of the Score, we want to see the Player’s staff name that includes all the instruments they play (in big band writing, it is common to refer to the sax players as “Reeds”, as they commonly double other instruments). On the first page of my score, I want to be able to see “Reed 3: Tenor Saxophone (+Flute)”. In the subsequent pages, I just want to see what instrument is being played in the moment in its “Abbreviated” version (just “T. Sax.” or “Flute”). Just like in the first picture at the beginning. of this post.
Here are the steps that you need to follow to achieve this:
Step 1
In Layout Options (cmnd+Shift+L/ctrl+shift+L) go to Staves and Systems/Staff Labels. With your current Layout selected in the list on the right (your score), go to “Staff labels of first system” and select “Full”. Next to “Staff labels on subsequent systems:”, select “Abbreviated”.

Step 2
In “Setup Mode”, go to the Player you want to edit, click on the “…” on the right of the first instrument, and select “Edit Names…”

Step 3
In the “Edit Instrument Names” window, type the “Full name” of the player (in my case it's “Reed 3: Tenor Saxophone (+Flute)”). Leave the “Short name” as it is.
You can also choose to display the abbreviated instrument name (“Reed 3: Tn. Sax (+Fl)”) within “Full name”. This has the benefit of giving more space to the staves and getting rid of excessive empty space at the left of the first page in the score.
Step 4
In “Show transposition:”, select “Never” (unless your player will play the same type of instruments but with different transpositions, e.g.: Clarinet in A and Clarinet in Bb). Then select “OK.”

Step 5
Repeat steps 2-4 for the other Instruments in the same Player, and add a space (“ “) at the beginning of the “Full name”. This will avoid each instrument is automatically numbered “1” and “2”.
Disclaimer: This creates a less-than-ideal scenario where the different instruments will display the same name, but only in the Player’s list in Setup Mode and in the “Galley View”. This workaround will display the correct names in the Score (in their “Abbreviated version”), independently of which instrument is being played first. For now, you’ll have to remember the order of your player’s instruments in “Galley View”. If you’re not sure which one is which, you can use the playback to give you a hint.

Step 6: You’ll come back to this step later to apply it to the Mute Changes.
In Layout Options (Cmnd+Shift+L) go to Players/Instrument Changes.
With your Score Layout AND the specific Player(s) Layout(s) selected on the right—including the future doubling player AND the brass instrument that uses mutes (you can select more than one layout by pressing Cmnd or Ctrl)— make sure you have these options selected:
“Allow instrument changes”: Checked
“Instrument names to use in change labels”: Short Names
“Show instrument change warnings“: Checked
“Show Instrument change label at start of flow“: Checked
“Show instrument change label after cue, if cue precedes first note in new instrument“: Checked
You can change other settings depending on your preferences:
Instrument transition position:
“After last note in old instrument”
“Before first note in new instrument” (this is the one I use, and the one recommended in “Behind Bars”, p. 510)
Prefix for instrument change warnings:
“To” (this is the one I use)
“Take”
“Custom” (You can specify the prefix and suffix of the label. You could choose to use “to” in lowercase, or any other options)

Step 7
To make the Instrument Change Label clearly noticeable by the player on their part, we can set a font change that applies to all the labels (The most common are underlining, and using a border, or “box”):
Go to “Library/Paragraph Styles…”
In the list on the left, search and select “Instrument Change Labels”.
Edit the font to your preference:
To get the “boxed” display, check the option “Border” and edit the padding and border thickness to your preference.
To just get the underline, you can find the option next to “Text decorations:”.
You can differentiate the font size in the Score and Parts (See options “Size” and “Size in parts”. I keep the option “Staff-relative” checked, just in case I end up later changing the staff’s “space” unit size.
Repeat steps b and c for “Instrument Change Warnings”.


Automated Mute Changes
Now that we have set our default Instrument Change options, we can use the same options for the mute changes in our brass instruments. However, we need to edit a few more things to adapt the settings for it to work properly. I’ll explain this process using a Trumpet player as an example:
Step 1
In Setup Mode, go to the Trumpet Player and select the “+” icon. Select a new Trumpet (in my case it’s in B-flat, and I’ll choose the instrument “B flat No key sig”, which is a quick way to avoid key signatures in transposing instruments), and click “Add”.
Step 2
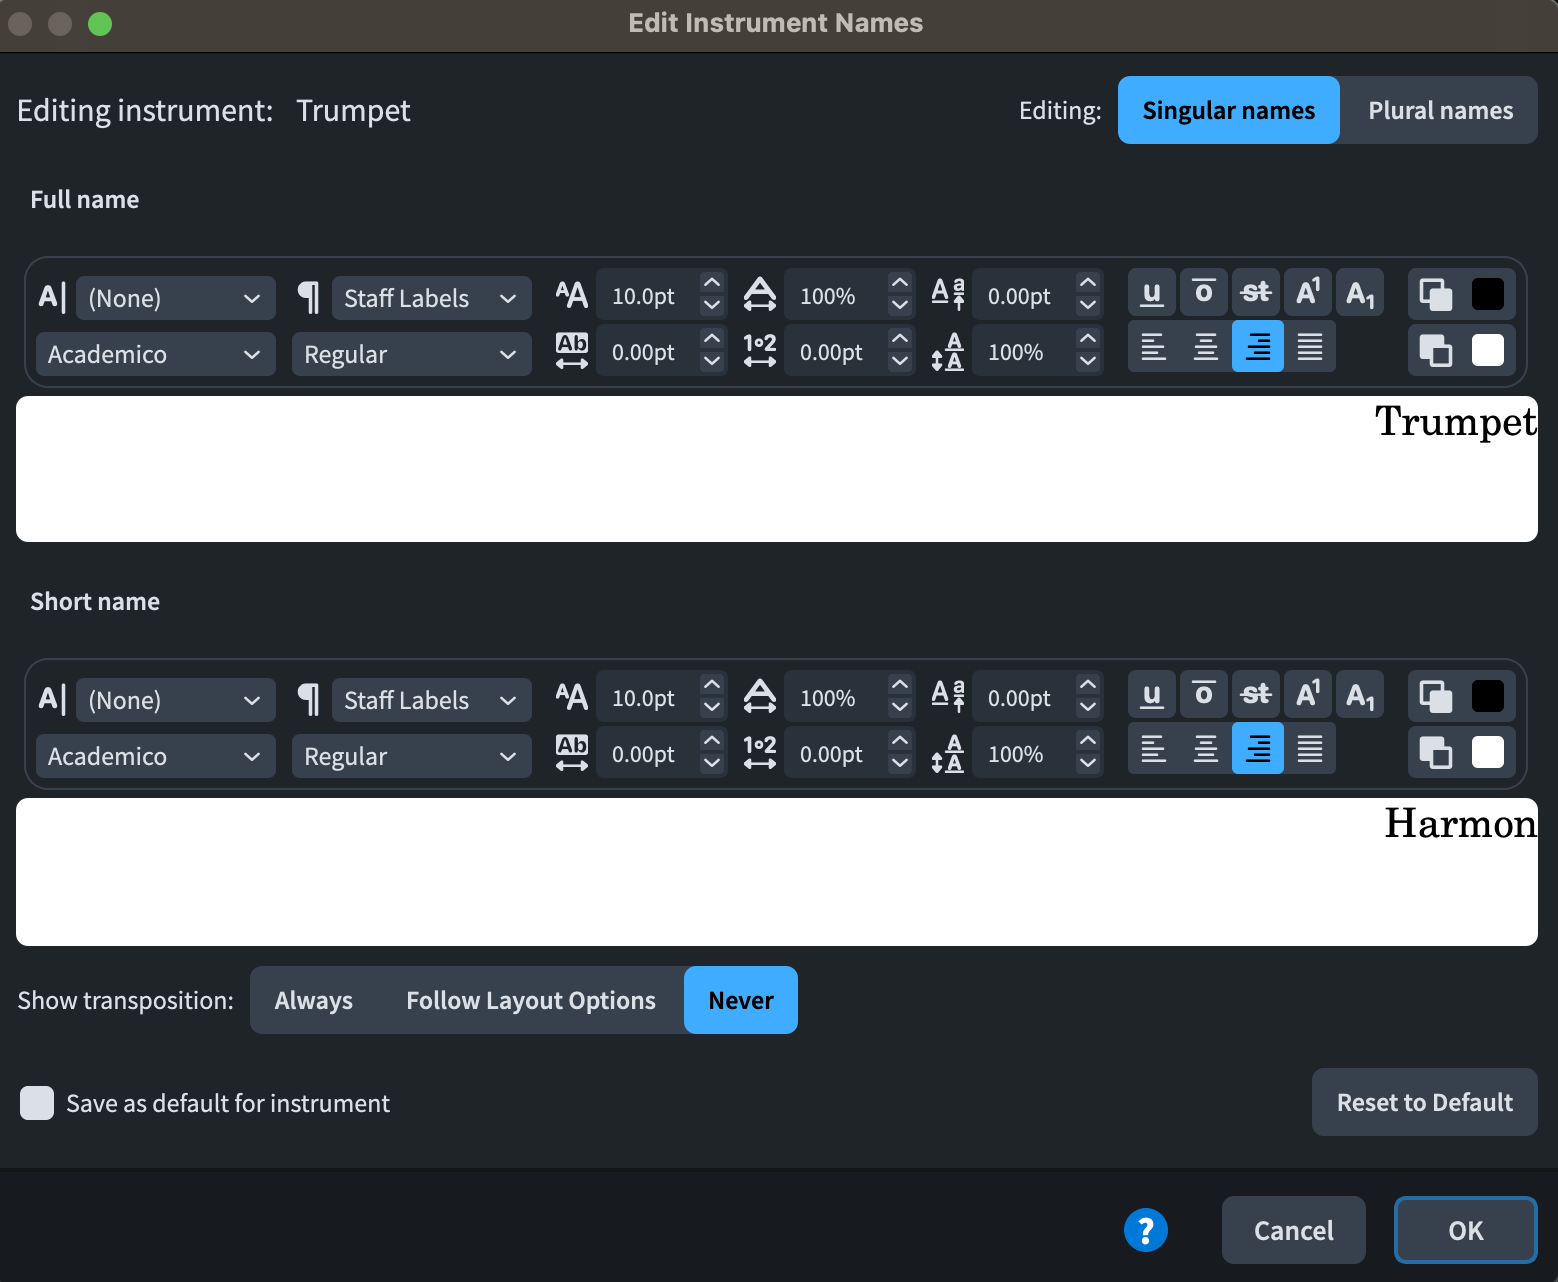
Select the “…” on the right of the first instrument in your Trumpet Player. Select “Edit Names…”

Step 3
In the “Edit Instrument Names” window, change the “Short name” to “Open”. In the “Show transposition:” option select “Never”.

Step 4
Repeat steps 2 and 3 with the 2nd instrument in your Trumpet Player. Instead of “Open”, write the specific mute you want to use. In my case, it’s “Harmon”.
You can add other mutes by adding more Instruments to the Player, as described in step 1, and follow steps 2-4.
Step 5
Rename the player as you would want it to be displayed on the first page of the score and on all the subsequent pages:
Right-click on the player (light-blue area, not the instruments) and select “Rename Player…”
Edit the names of the Full and Short names. These are my settings: “Trumpet in B♭ 3” and “Tpt in B♭ 3”
If you want to include the “♭” symbol instead of the default “b”, you can just copy it from here and paste it over there (you’re welcome!).


Step 6
Go to Layout Options (Cmnd+Shift+L)/Staves and Systems/Staff Labels. Select your Score layout in the list on the right. In the “Show player name instead of instrument names:” box, select the Player that plays with mutes (in my case it’s the “Trumpet in B♭ 3”). Under “Show player names:” select “On all systems”. Also, check the box next to “Show first sounding instrument on system”. Click “Apply”.
All these steps will ensure that we always see the same instrument name in every staff label across the score. Remember that in the Step 1 of Instrument Changes (scroll up!) we set up those options to display Full name in the first system—a.k.a. fist page—and Abbreviated on the subsequent systems/page).

Step 7
In Write Mode, go to Galley view, select “Playing Techniques” in the Right Menu, click on the Brass sub-menu, and select the specific mute you want for your player. Next, click on the first measure of the specific staff that you’ll assign the mute to (In my case, it’s the player’s second staff). This will ensure that you hear the muted instrument in the playback.

If you write a note in the second trumpet staff and go to Page view, you’ll see both the Instrument Change Label and the Mute Label. To hide the mute label (from this Playing Technique, not the Instrument Change Label), select it, open the lower pop-up menu, and select the option “Hidden”.

You can hide the purple signpost in View/Signposts/Playing Techniques (unchecked).

Step 7: Write some music!
Finally, similarly to how you assigned the music for the Tenor Sax and Flutes in “Galley View”, you’ll do the same with your Trumpet without and with mutes. Although Dorico doesn’t natively think of brass instruments with mutes as separate instruments, we do (well… at least I do :B)

Step 7.2
At this point, we want to double-check that we applied Step 6 of Automated Instrument Changes (scroll above!) to this Trumpet Player Layout, so both mutes and instrument changes look the same way.
And that’s it!

Thank you for reading the whole post! If you made it all this way, you can now rest assured you’ll never miss any instrument change label ever again, and your music and performers will benefit immensely. To recap on some benefits:
You will have saved precious minutes of rehearsal, avoiding questions from musicians due to missing or, unclearly notated instrument change labels on your part.
The performance will have more chances of running smoothly, as all the instrument changes are labeled correctly and promptly anticipated, which gives the performer the confidence to trust the part and focus on the execution.
Get notified of my next posts!
To receive an update every time I post something here make sure to fill the form at the bottom of this page. Thank you!
References:
Gould, Eliane. “Behind Bars: The Definitive Guide to Music Notation”. London: Faber Music, 2011.